Realistic weapons in Spy DNA: How deep does this rabbit hole go?

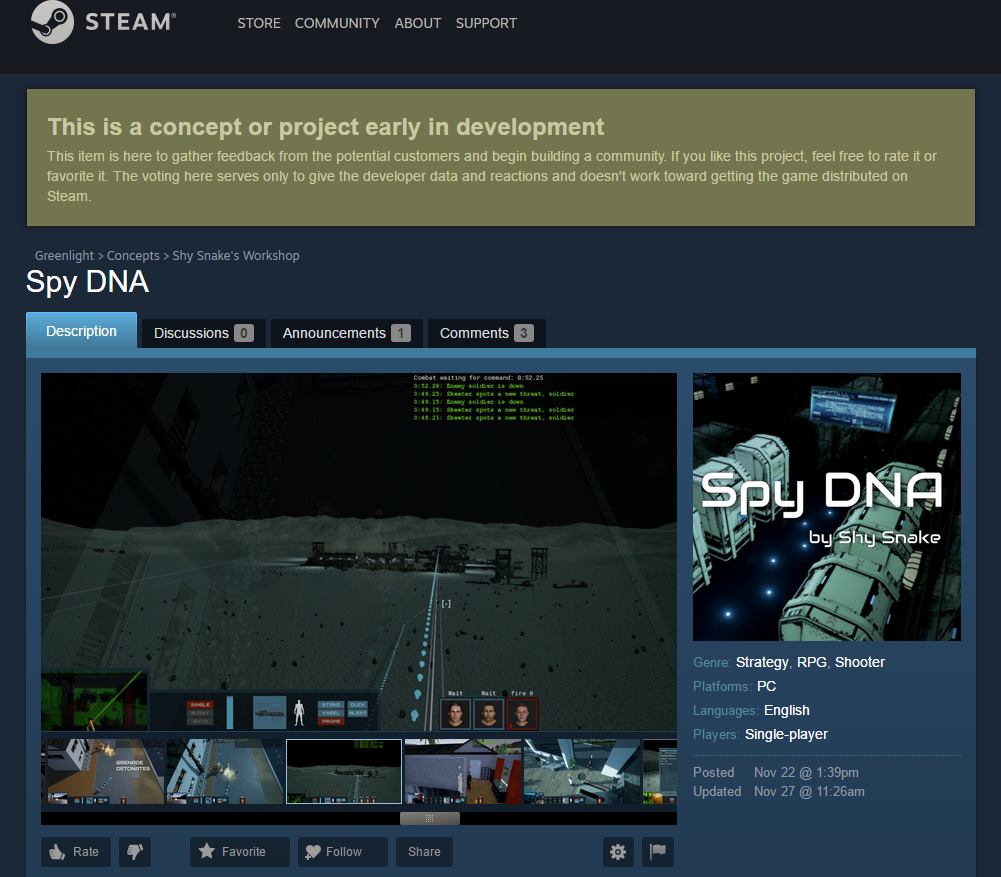
As we’ve been known to say on more than one occasion, we want Spy DNA combat to feel very realistic, and by extension this means that the weapons also need to work like you’d expect them to in real life.

On one hand, weapons need to work realistically, in the sense that they should have a range and damage specifications similar to the ones in real life. Sniper rifles are best used at ranges over 100 meters (and we’ll make sure there are maps big enough for that to matter), and handguns are a good choice for concealed weapons or closed-quarters combat, where you’d have difficulty wielding a long-barreled assault rifle.

If you’ve been following us for a while, you know that that’s a given, and a premise of our whole game, really. When we set out to build Spy DNA, we wanted to provide the player with as realistic a combat simulation as possible, while still making it a game.

The main implication is that the realism makes for a slightly different set of perks and challenges than a typical shooter. We want for the player to be able to use the common sense and knowledge of how things work in the real world to navigate the game. Basically, if you think doing something would get you (or the opponent) hurt or killed in the real world, it should be the same in Spy DNA. Case in point, head shots. Best to avoid them. Or land them on your enemies.

Just like the real deal (P25 dart pistol)

But on top of that, the weapons also need to look the part. If we gave our soldiers guns that look like they’d be hard to get through an ordinary doorway, or were too heavy to even lift, the realism and the immersion go out the window. Don’t get me wrong folks, there ain’t a thing in the world wrong with games that do that, but it’s just not where we chose to take Spy DNA.

The little screen on the back shows ammo levels and other useful info to the shooter

So while designing the weapons, working together, Jason, Denis and I have been periodically taking a step back to check whether the weapon still looks usable, practical, and like something that you could imagine the military of 2075 using. You could overhear us having conversations about making sure that we don’t eject brass into the user’s face or hands, or make the shiny trim reveal the position of our sniper.

We put a lot of thought into the ammo feed position, grips, and how easy would it be to reload or unjam in a firefight, what accessories the owner may want to add and where, and so on. Denis put immense attention to detail into each weapon, and as a result we have game guns in which the sights align when you’re looking at them like you’d be aiming. The fact that it’s a 3rd person game where the player will most likely never see these little details doesn’t mean that we don’t pay attention to them.

Most weapons in our game will have a range of accessories/extensions such as scopes, sights, grips, bipods, and extended ammo clips that the player can choose to equip to add a touch of personalization to their kit.
If our Early Access really takes off, we should have the funds to make more customizable parts for the guns, including rare mods, color schemes, and accessories that can only be gained by completing certain missions.

Stay tuned for the announcement of our Greenlight campaign!

Procedural map generation in Spy DNA

by Jason Sams

It’s been a while since I wrote my last update. I’ve been hard at work on a few things. But as promised in the last update, today we will talk about mission maps.

We have the core of the map generation up and running. We have tested it generating maps from 128 meters square to 2 kilometers.  Map generation times are pretty good; just a few seconds in most cases.  

Procedural map of a wooded rural area with roads and trees

The maps are complete with bushes and trees. We are planning to add grass too, but that is a little harder to do without hurting performance, so it may not make our first Early Access release.

The size of the map will have a large effect on the time a mission takes to complete, and the general flow of a mission. For example, on a small 256 or 128 square meter map, there is no reason to bring any sniper weapons with you on a mission. Most of the regular rifles are “good enough” at those ranges while being much more useful up close.

Closer view of a procedural map, showing transition from sandy to grassy terrain

We understand our players will have a variety of play styles. So we will be adding an option to the settings to adjust the map size to larger or smaller to mirror what you enjoy most. This will apply a +1 or -1 to the map size settings. The supported map sizes are 128, 256, 512, 1024, and 2048 meters. At the default settings all missions will be on maps from 256 to 1024 meters. So applying the +1 would change that to 512 to 2048. 

When you start a mission, you will be able to see all of the terrain. We assume that in the future you'll still have satellites and drones to recon the area before you deploy. Hidden or movable items such as enemy patrols will be hidden by the fog of war until a team member manages to spot them. Once spotted, they will be marked on the map. If you lose contact, the marker will remain at the last position a team member saw them.

With the upcoming demo we will be using the procedural maps to allow the player to generate skirmishes. We want everyone to have a chance to try out our unique combat system and get a feel for the game.

Behind the scenes: How are Spy DNA weapons made?

Hey everyone, and welcome to the second part of our introduction to the workflow for creating the assets. If you haven't read the post about who I am, you can check it out first. Today I wanted to talk about my process for creating the assault rifle for Spy DNA.

Conceptualizing the weapon

The first thing that needs to be done before any actual modeling is the concept. This phase of the project is quite important as it will set the dynamic of the work follows.

Another very important thing when creating a model that doesn't exist in real life is to make it appear functional.

Creating the concept for this weapon started with the basic choice of ammunition feed system. For this gun we chose a bullpup design, which means the clip feed is integrated in the stock.

The next thing that was to provide places for the attachments, such as scope, holo-sights, etc. This meant we would be using threaded rails on the gun for the actual attachments.

Modeling the weapon

So now that we have the concept, or the guidelines for our weapon we can proceed to the modeling phase. This is the phase in which we need to be careful on how our concept will come together. Also this is where we need to make our model scale be in line with a realistic model. The reason why this is important is because we want to make sure the weapon animates well in-game, and that the characters using it will look good doing so.

For the actual modeling I used 3ds Max, and basic polygon modeling techniques. The main goal here was to keep the design guidelines in mind and make it into a complete weapon. After a few different versions and going through a few failed designs I ended up with a base model that the team and myself were happy with.

Now that the basic shape was achieved it was time to add in the fine details like little screws, bolts, rivets, threads and the barrel threading. Once all of this is done, we basically have the high polygon count (high-poly) model for our game.

If you are curious as to how all this works, go ahead and check out my YouTube channel.

Getting the model game-ready

Once we have the high-poly model, we need to make a game-ready (low-poly) model. The process of creating a low-poly model of an existing high-poly model is called retopology.

This is one of the more time-consuming parts of the asset creation. Here you basically need to make the 3D model that can be used in the game engine. This means that you will have a polygon budget that will limit how much detail you can put in your model. If you aren't careful of your budget, you can end up putting a strain on the player's computer, and their framerate will drop, and nobody likes that.

This is how the low-poly model of the SR100 looks underneath the textures.

For this project I did most of my retopology in 3ds Max, but I also used Topogun and 3d Coat. When you're done, you get a low-poly model that has the basic shape, but not the surface details of the high-poly model. Next, we'll need to unwrap it so we can apply textures.

Texturing the model

Once we have an unwrapped model, we can continue to the texturing phase. In this phase first we bake the surface details from the high poly to the game model. This way in the game the weapon will look as if it still had all the little screws, buckles, etc., even though the low-poly model has none of that. 

After this is done we go with the actual application of the materials. I used Substance Painter which is an application for texturing to do the textures for the weapon. With the model done, unwrapped and textured we have the finished model that will be used in the game.

What's next?

If you're still with me, then you were able to get a little taste of what it takes to create a game asset from start to finish.

As we make progress developing Spy DNA, we'll be making more posts like these, so you can look over our shoulders in a way. You will get to hear from the other team members, each talking about their aspects of creating this game.

So for today that would be all from me, and remember to come back and check on our progress often!

-- Denis Keman

Introducing Spy DNA 3D artist

This is a post written by our talented 3D artist Denis Keman. We'll be publishing a series of posts by Denis, which will cover his creative process, and provide insight into how game models are made.

Who am I ?

Hey everybody, my name is Denis Keman. I am a 3D modeler and a 3d generalist. My YouTube channel (Denis Keman - "very creative i know") is all about 3d modeling. I was lucky enough to get a chance to work on the upcoming game Spy DNA. I was hooked on this project because of the old “Jagged Alliance” feel that it had. Then I met the awesome team at Shy Snake Games and we just hit it off instantly. 

Now with that short intro out of the way, i would like to tell you a bit about my workflow. And what i use to do the things i do.

What do i use in my workflow ?

First things first, what you need to know is that 3D work is basically art. To understand it, you need to know the tools that were used. 

In the field of 3D modeling you have a wide array of different tools like Blender, Maya, Rhinoceros, Max etc. All of these are 3D modeling packages, and the one that I use is 3DS Max. I created the high poly and the low poly models in 3ds Max, and texturing was done with Substance Painter. 

If you are not a 3D modeler, you might ask what’s the difference between high and low poly model. Well it's basically two models with different levels of detail for the same thing. The idea is to get the high poly details onto the low poly model (the one you see in game). That way you get a good-looking model that doesn’t eat up all of your system resources when it’s rendered in-game. In order not to get too technical I will leave that for a future post.

The creative process

Getting from point A to point B is not always a straight line, especially in creative work. The first thing that needed to be modeled was the weapons that will be used in-game. The idea here wasn't to simply recreate an existing real-life weapon, but rather to design a unique one. 

The first custom design model was the P-15 handgun. This gun is compact, easy to conceal and carry around. That means that the frame in not bulky and has flowing lines. 

Another thing that i had to keep in mind was the fact that it didn't shoot conventional ammo. Instead it was shooting gun darts, which meant that the barrel had to be different from a conventional firearm. 

Another thing that I had to put into the design was a screen at the back of the gun for showing the shooter their ammo status, firing mode, etc. After going through a few design iterations I ended up with the design you see below.

Summary

Since this is the first blog post from me, I would like to cut it short here. I hope it was fun, and that you enjoyed a glimpse into my design process. You should also have a better idea of what the process behind making a game model looks like now. Next time we will go over how the creation process goes for a different weapon. 

And if you would like to see a more technical look at things, leave a comment down below. Depending on what you’d like to know, I will do my best to explain it. 

For any information about the game hit us up on twitter @ShySnakeGames. And don't forget to share this around so more people can hear about Spy DNA. Remember folks, sharing is caring.

So that would be it for now. I will see you all next time.
-- Denis Keman

Base level preview

Wanting to take advantage of the great outdoors rendering capabilities of Lumberyard, we've "moved" the Spy DNA base to a small island, which can only be reached by sea or air. The island will also feature a helicopter landing pad and an extensive training facility for the Spy DNA agents to use between missions to hone their superhuman skills.

Here's a screenshot of the pier for you while we're working on the base level.

Spy DNA now has a Steam Greenlight Concept page

Folks, we've got some exciting news for you! Spy DNA now has its very own Steam Greenlight Concept page, where you can discuss it with other Steam users and provide your feedback to the team.

We watch the comments very closely and reply to questions and feedback as they come in.

So go ahead, visit Spy DNA on Steam and give us a thumbs up if you like what you see!

Animating with Lumberyard

We have been hard at work on animations and we finally have something to show. Getting to this point meant processing close to 400 animation clips (so far) and importing them into the engine. This is more than double the number we were previously using.

With Unreal we used in-place animation. What this means is our code would would move the character and select an animation to play when you give the character an order. While these activities were coordinated, they didn’t directly talk to each other. As a result you often get visual artifacts such as the characters feet slipping across the ground.

We chose in-place because it was proving difficult to get root motion working with the navigation system in Unreal. With Lumberyard we introduced our own motion controller that sits between the engine’s pathfinding code and the animation system. What this new motion controller does is turn the path into a series of animations that need to be played. 

So now we are generating a sequence of animations. What root motion means is each animation we play tells the engine how much the character moved that frame. Because the animation is now the source of both movement and animation the places where the character contacts the world such as their feet are much more effectively kept in sync.

Now, even this system has limits. For example when you start movement we choose between nine animations to start the movement [straight ahead, left 45,90,135,180, and right 45,90,135,180]. This means we still need to make a minor adjustment to the character's path. We also make small adjustments while the character is moving to keep them on the path. Generally these are small enough to not be noticeable.

Before we ship we will probably have close to 1000 animation clips. As you can imagine picking the right one to play in every case is really tricky. With Unreal this was managed by creating a state machine which selected which animation to play based on the state of a character. For us this proved very difficult to make robust. 

Lumberyard is driven by a database of animation tags. For example a tag state for the movement animation might be “stand”, “unarmed”, “jog”. When we ask the system to play an animation of type “move” it would search the database for an animation with the matching tags. This greatly reduced the work we had to do to manage the selection process.

Now it has not been all smooth sailing. Lumberyard makes it much more time consuming to import our animation clips.  As a result we have only imported the most important animations so far. The Lumberyard team are working on improving the import process, so we will return to this later, when they finish their new .FBX pipeline.

The end result is we are rapidly converging on shipping quality for the animation system. In the next development update we will talk in detail about how we do procedural map generation.

Lumberyard

It’s been a really busy two months here at Shy Snake. We have made a few adjustments to the development of Spy DNA which we think will make for a better game. The big change is we have moved from Unreal to Lumberyard game engine. This also created an opportunity to make a few other smaller changes to the game.

We decided to move to Lumberyard because it allows us to make much more dynamic maps. Unlike other engines it doesn’t require us to pre-bake lighting to get good quality lighting on the maps. This frees us up to procedurally generate maps, allowing for a greater replay value and much more variety in missions. It also allows us to change the maps on the fly in response to player actions. This means a more destructible world. 

We are mostly complete with the port of the game code to Lumberyard. AI is the last major piece left to do. At this point the UI is mostly complete, the game logic code is ported, animations are working, and we integrated the articy code for the dialog system. We are still on the same schedule as previously announced with a public demo / early access, possibly as early as December, but for sure in Q1 2017.

Animation is another area that was impacted by the change. We are switching from in-place animation to root-motion animation. What this means for the players is the characters should move in much more realistic ways. The characters’ feet should slip far less. Also we added start, stop, and turn animations so the beginning of movements will look a lot better. 

The transition required us to re-import all of our art assets. We took this as an opportunity to replace our character models with higher quality models. To do this we switched character creation tools and are now using iClone Character Creator. 

Same character created in Autodesk Character Generator on the left and iClone Character Creator on the right.

Now that we have worked with Lumberyard for almost two months, we have learned a lot about it. If fits very well with our code base. As we have settled in the level of productivity on our game, code is settling at a higher level that we achieved with Unreal. This means we will be able to put more effort into building a good AI for you, the player. 

Now it’s not been all positive. On the art side things are going a bit more slowly. Lumberyard is an editor in transition which has created some overhead for us in making maps. In part this is offset by switching many maps to procedural generation. However, it will be a bit before we can show you the before / after of the player base. Yes, even though we can now procedurally generate maps, we can also still hand-generate them. 


We will have much more on this going forward. I believe the engine transition will allow us to ship a game which is more in line with what our players expect. It allows us to generate a much larger variety of maps, allows you to have a larger impact on the map in terms of being able to destroy objects, and allows us to invest more heavily in AI making the gameplay more interesting.